|
 |
 |
|
|

| MATERIALS: |
 |
8 or 9 clean, plastic gallon jugs |
 |
String |
 |
Scissors |
 |
Craft knife |
 |
Glue gun |
 |
One-hole punch |
 |
Neon paint (optional) |
Time needed: Under 1 Hour |
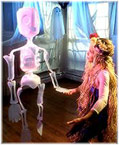
1. To make the head, choose a jug with a
pair of circular indentations opposite the handle and turn it upside down. In the corner, opposite the handle, cut out a large,
smiling mouth, centered under the indented "eyes." Make two small slits in the top of the head and tie a loop of string through
them for hanging the finished skeleton. 2. For the chest, cut
a vertical slit down the center of a right-side-up jug, directly opposite the handle. Cut and trim away plastic to make the
rib cage. Glue the head and chest together at the "neck" by connecting the spouts of the two jugs with a thick band of hot
glue. Hold the jugs together for a few minutes until the glue cools. 3. To
form shoulders, cut off two jug handles (leaving a small collar on the ends) and attach them to the chest section with hot
glue. Punch a hole at one end of each shoulder. 4. For hips,
cut all the way around a jug, about 4 1/2 inches up from the bottom. Take the bottom piece and trim away a small smile shape
from each side to make a four-cornered shape. Punch holes in two opposite corners. 5. Make a waist by cutting out two spouts, leaving a 1/2-inch collar on each. Glue the spouts together
and let dry. Then, hot-glue the waist to the bottom of the chest and the top of the hip section. 6. Form arms and legs by cutting eight long bone shapes from the corner sections of three jugs (cut into
the curved shape of the jug to make the bones even more realistic). From four of these bones, cut out the center to make lower
limbs (forearms and shins). Punch a hole through the ends of all eight bones. Use string to tie two arm sections to each shoulder
and two leg sections to each hip. 7. Let kids trace their hands
and feet onto the side of a jug, then cut out the shapes. Punch holes in the hands and feet, and tie them onto the arms and
legs. Variations: Paint Mr. Bones a neon
color to make him appear to glow.
|
|
|
 |
 |
 |
 |
|
|

| MATERIALS: |
 |
Black knit cap |
 |
1 pair of kids' or women's black socks |
 |
Child-size black tights (size 4-6 or 6-8) |
 |
1 black tube sock or kneesock |
 |
Polyester fiber stuffing |
 |
2 18-inch lengths of floral wire |
 |
Scissors |
 |
1 sheet of black felt |
 |
1 sheet of gray felt |
 |
Glue gun or double-sided tape |
 |
1 sheet of orange felt |
 |
Two 1-inch googly eyes |
 |
Mouse toy |
 |
Needle and thread |
 |
Duct tape |
Time needed: Afternoon or Evening |
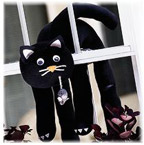
 1. 1. To make the body, fill the cap, socks and tights with stuffing, leaving at
least 2 1/2 inches of unstuffed fabric at the opening of each article. Twist the wires together and insert them into the tail
(tube or kneesock). Fold under any extra.  2. 2. Cut out 2 notched ears from the black felt. Then cut 2 small gray felt triangles
and glue or tape them to the middle of each ear. 3. Cut whiskers
and 12 claws from the gray felt and a triangular nose from the orange felt. Using the glue gun or double-sided tape, affix
the ears, googly eyes, whiskers and nose to the top of the cap. 4. Sew
the mouse toy to the cat's mouth. Attach the claws to the tips of the two shorter socks and the tights. 5. To assemble the cat, cut a strip of duct tape 6 inches longer than the width of the
cap. Center the tape over the opening of the cap and, standing outside your double-hung window, secure the cap along the bottom
edge of the top window (see illustration). 6. Next, tape the
front paws along each side of the head. Tape the open end of the tail to the opening of the tights, between the legs. From
inside the house, tape the body to the top of the lower window (see illustration). Let the legs and tail flop down over the
tape. If you like, wedge a rolled-up sock between the legs and the tape to give more arch to the cat's back.
|
|
|
 |
 |
 |
 |
|
|
|
Trick-or-treaters can step into a silly cemetery--a not-so-grave site-- made of these cardboard
gravestones.
STEP 1: Cut the stones out of cardboard, paint them gray, then inscribe with silly epitaphs, such as Scared E. Cat or Hal
O. Ween.
STEP 2: The night of the party, use duct tape to attach a garden stake to the back of each tombstone and stake them all
in the front yard, tipping some at odd angles for that 17th-century look.
STEP 3: Partially bury a hat or boots in the front of each stone so it looks as if the deceased may rise to the occasion.
| |
Materials |
| |
• Cardboard
• Scissors
• Gray paint
• Markers
• Garden Stake
• Duct Tape |
|
|
|
 |
 |
|

