|
|
|
|
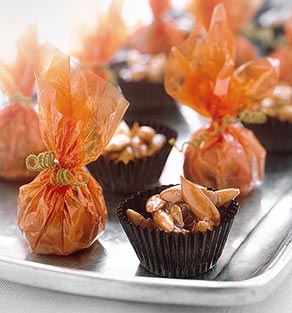
| Makes 30 pieces |
| These wrapped candies are perfect treats for celebrating Halloween. Pepitas, or pumpkin
seeds, are available hulled or unhulled at health-food stores. Paper candy cups are available at baking supply stores. |
| |
| |
|
| 1 |
 |
cup hulled pepitas |
| |
|
| 1/4 |
|
cup sugar |
| |
|
| 2/3 |
|
cup good-quality
honey |
| |
|
| 3 |
|
tablespoons cold unsalted butter, plus 2 tablespoons melted for
brushing |
| |
| |
1. Heat a large skillet over medium-high heat. Add pepitas;
toast, stirring constantly until seeds pop and become slightly golden, about 3 minutes. Transfer to a bowl to cool. |
| |
| |
2. Place sugar and honey in a small saucepan. Bring
to a boil over medium-high heat, stirring to dissolve sugar, about 3 minutes. Add pepitas, and continue cooking until temperature
registers 285° on a candy thermometer, 3 to 4 minutes. Remove from heat, and stir in cold butter. |
| |
| |
3. Let the mixture cool to 240°, about 4 minutes. Meanwhile,
brush the inside of fifteen 1-inch-diameter black paper cups with melted butter, reserving 1 tablespoon. Spoon a scant tablespoon
of the honey mixture into each cup. Brush a clean work surface with the remaining butter, and spoon the remaining honey mixture
on it so mixture will continue to cool. |
| |
| |
4. When remaining candy is stiff and cool enough to
handle, about 6 minutes, cut into 3/4-inch pieces with a greased knife. Put one piece of candy in center of each of fifteen
4-by-4-inch pieces of orange cellophane wrap, gather cellophane at the top, and secure with a twist of a 4 1/2-inch piece
of floral wire. Wrap the ends of floral wire around a skewer to form tendrils. |
| | |
|
|
|
|
|
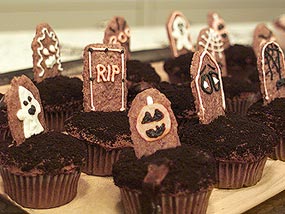
- To make a cupcake cemetery, spread devil's-food cupcakes with chocolate-ganache icing (all recipe links follow). Dip the
top of each frosted cupcake in crushed chocolate wafers to create the look of dirt, then insert shortbread-cookie tombstones,
piping them with scary messages like “Boo!” or “R.I.P.” in royal icing.
- Top more devil's-food cupcakes with chocolate ganache and chocolate-wafer “dirt,” make a hole in the center
of each cupcake with your finger, and position half a Gummi worm to look like it's slithering out of the hole.
- Enlist your kids to draw scary Halloween figures, or copy Halloween images out of books. Cut the pictures out, tape them
to cocktail straws (you can cut the straws shorter, if necessary), and insert them into cupcakes you've decorated with orange-tinted
cream-cheese frosting.
- Decorate more devil's-food cupcakes with orange cream-cheese frosting, then spell out words or phrases like “Happy
Halloween” by forming one to three letters out of thin black licorice on top of each cupcake.
- Serve your cupcakes on a tray covered with candy corn.
|
|
|
|
|
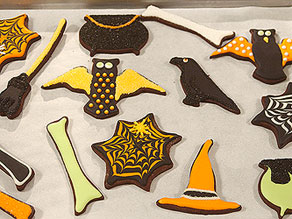
Chocolate Cookies
Makes about 16 large cookies |
 |
3 cups sifted all-purpose flour, plus more for dusting
1 1/4 cups cocoa powder
1/2
teaspoon ground cinnamon
1/4 teaspoon salt
3/4 pound (3 sticks) unsalted butter
2 1/2 cups sifted confectioners’
sugar
2 large eggs, lightly beaten
1 teaspoon pure vanilla extract
Royal Icing
Green, orange, and black liquid or paste food coloring
Sanding sugars |
|
| 1. In a large bowl, sift together flour, cocoa powder, cinnamon, and salt. Set aside. |
|
| 2. In the bowl of an electric mixer fitted with the paddle attachment, cream butter and
sugar on medium speed until light and fluffy, about 2 minutes. Beat in eggs and vanilla. |
|
| 3. Add dry ingredients; mix on low speed until thoroughly combined. Divide dough in half,
and wrap in plastic. Chill for at least 1 hour. |
|
| 4. Preheat oven to 350°. On a lightly floured surface, roll out dough a 1/8-inch-thickness.
Cut into desired shapes. Transfer to ungreased baking sheets; refrigerate until firm, 15 minutes. Bake until crisp but not
darkened, 8 to 10 minutes. Transfer to a wire rack to cool completely; decorate as desired. |
|
Coloring Tips for Royal Icing
The key to making
these beautiful cookies is in the colorful royal icing tinted with professional-quality food colorings. Royal icing is made
from confectioners’ sugar and egg whites, but meringue powder is often substituted for the raw egg whites. Although
you can use a concentrated gel paste or a powdered food color, bakers and decorators usually prefer liquid paste for its consistent
and brilliant color. |
|
| 1. For dark colors such as black and orange, start light and work toward a deeper color.
Add color with a toothpick, a tipful at a time, mixing thoroughly with each addition. |
|
| 2. The color will fully develop as it sets, so wait about 1 hour to observe the end result. |
|
| 3. Mix in daylight so that you can see the true color of the icing. |
|
| 4. Always use clean toothpicks with each new addition of food coloring. Food coloring has
a long shelf life, but any contamination with perishable ingredients will hasten spoilage. |
|
| 5. Cover each bowl of icing with a damp towel to prevent it from hardening or forming a
“skin.” |
|
| 6. Work with clean piping tips to ensure application of the right color. |
|
| 7. Place a damp paper towel in the bottom of a juice glass to hold icing bags. Keeping tips
damp when not in use will prevent the icing from drying out and clogging the tip opening. |
|
Decorating Techniques
Flooding:
Used for coverage. Use a # 2 or #3 tip held 1/4 inch above the cookie. Follow the outline of cookie, leaving space along the
edge for spillage, then fill in the outline with icing. To close empty spaces, push icing in place with clean toothpick. |
|
| Raised designs: For a three-dimensional effect,
dry the flooding layer for at least 2 hours, then pipe on top of dried icing. |
|
| Sugaring: Sanding sugar is sugar that has been
processed into small, round grains four to six times larger than grains of granulated sugar. The result is a sparkling effect.
To apply, place cookie on waxed paper, and sprinkle sugar over the top of cookie. Let cookie sit for about 15 minutes, then
tip the cookie upside down to remove excess sugar. |
|
|
|
|
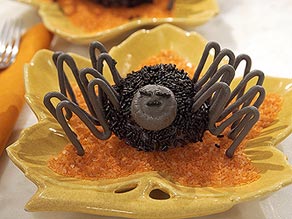
| Makes 6 cakes |
| To make these sinister-looking cakes, you’ll need our Spider Cake Kit. |
| |
| |
|
|
|
Unsalted butter, room temperature for molds |
| |
|
| 1/4 |
|
cup unsweetened cocoa powder, plus more for molds |
| |
|
| 1/2 |
|
cup all-purpose flour |
| |
|
| 1/2 |
|
cup sugar |
| |
|
| 1/4 |
|
teaspoon baking soda |
| |
|
| 1/4 |
|
teaspoon baking powder |
| |
|
| 1/4 |
|
teaspoon salt |
| |
|
| 1 |
|
large egg yolk |
| |
|
| 1/4 |
|
cup warm water (110°F) |
| |
|
| 1/4 |
|
cup buttermilk |
| |
|
| 2 |
|
tablespoons vegetable oil |
| |
|
| 1/2 |
|
teaspoon pure vanilla extract |
| |
|
|
|
Black
Swiss Meringue |
| |
|
| 1/4 |
|
cup black sprinkles |
| |
|
|
|
Black
Italian Meringue Buttercream |
| |
| |
1. Preheat oven to 350°. Butter six 1 1/2-by-3-inch
dome flexible baking molds, and dust with cocoa, tapping out any excess. Set aside on a baking sheet. |
| |
| |
2. In the bowl of an electric mixer, sift together cocoa,
flour, sugar, baking soda, baking powder, and salt. |
| |
| |
3. Add egg yolk, the warm water, the buttermilk, oil,
and vanilla to the flour mixture. Using the paddle attachment, mix on low speed until smooth, about 2 minutes, scraping the
sides and bottom as necessary. |
| |
| |
4. Pour batter to within 1/4 inch from the top of each
mold. Bake, rotating once, until a wooden skewer inserted in center comes out clean, about 25 minutes. |
| |
| |
5. Invert and unmold cakes onto a wire rack; set aside
until completely cool, about 30 minutes. Trim cakes flush with the top of the molds, using a serrated knife. |
| |
| |
6. To create the heads and legs: Fill a medium pastry
bag fitted with a coupler with black meringue. Using a #7 pastry tip for the heads and a #4 pastry tip for the legs, pipe
directly onto a parchment-lined baking sheet, keeping the pastry bag at a 45-degree angle to the baking sheet. After piping
the heads, carefully affix sprinkles for eyes and mouths. Transfer to oven, bake at 350° for 5 minutes; set aside. |
| |
| |
7. Using an offset spatula, spread black buttercream
over each cake to evenly coat. Cover with black sprinkles; set aside. |
| |
| |
8. Transfer the remaining buttercream to a small disposable
pastry bag; snip off the end to make a small hole for piping. Carefully pipe a small amount of icing onto the end of one of
the spider legs, and attach to one of the spider-body cakes; apply a small amount of pressure to insert the leg into the frosted
body. Repeat with remaining legs and cakes. |
| |
| |
9. Pipe a small amount of buttercream onto the front
of one of the bodies, and carefully attach the head. Allow to set; carefully transfer to serving plate by sliding a large
spatula under the body from the back of the cake. Repeat with remaining cakes and heads. | |
|
|

|
|
Yields approximately 9 dozen bite-sized eyeballs
3 oz lemon gelatin (can be sugar-free)
1 cup
hot water
1/2 cup miniature marshmallows
1 cup pineapple juice
8 oz cream cheese (can be lowfat/Neufchatel)
1
cup mayonnaise (can be fat-free)
Dissolve lemon gelatin in 1 cup water in double boiler, add marshmallows and stir
to melt. Remove from heat. Add pineapple juice and cream cheese. Beat until well blended. Cool slightly. Fold in mayo. If
you have a truffle candy mold or round ice cube trays, pour the mixture in the molds and leave to set in the fridge. Otherwise
pour into a deep ceramic dish and chill until thickened or firm enough for scooping into eyeballs. Using a melonballer, scoop
full balls of the mixture and set aside for decoration. To decorate, use liquid food coloring and an old detail paintbrush
and get creative. You will need black food coloring for the pupils. Also, if you are in a hurry, instead of painting the colored
irises, you can carefully dip the ball in a small pool of food coloring to approximate the iris, but still paint on the pupils.
For
1999, I found rubber ice cube trays that worked beautifully with much less waste than the melonballer technique. I sprayed
the rubber trays with non-stick cooking spray beforehand like you would any gelatin mold, let the gelatin mixture sit in the
refrigerator to set, then I was able to carefully pop the eyeballs out to paint them. Some of the eyeballs did break, and
they do have one flat side, but that actually works, since then they don't roll around while you are trying to paint them.
Since 2001 I have found that Wilton truffle candy molds are even better, since the swirl design on the top is the right size
for the cornea shape on the eyeball. When using the truffle molds, one recipe makes about 9 dozen eyeballs - plenty for a
party crowd!
|
|
|
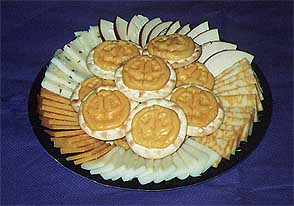
Jack O'Lantern Cheese and Crackers
your choice of cracker (Ritz is pictured)
orange cheese, preferably already sliced
a contrasting layer
(I used white cheese slices)
Cut the slices of cheese into cracker-sized squares. Cut the orange cheese into jack-o-lantern
shapes by hand, or use a miniature cookie cutter if you're lucky (I wasn't lucky, so I cut all of these by hand). Lay the
contrasting layer on the cracker, then top with the jack-o-lantern slice.
For 1999, I used a cookie stamp on melted
American cheese while it was cooling in a flat cookie sheet. After it cooled thoroughly, I trimmed away the edges and had
what you see above with the purple background.
|
|

|
|
Yield: 5 dozen
1 cup Butter, softened
1 cup Icing sugar
1 Egg
1 tsp Almond extract
1
tsp Vanilla
2 2/3 cups Flour
1 tsp Baking powder
1 tsp Salt
3/4 cup Almonds, whole blanched
1 Tube red decorator
gel
(optional, not pictured)
Gross everyone out with these creepy cookies.
In bowl, beat together butter, sugar,
egg, almond extract and vanilla. Beat in flour, baking soda, and salt. Cover and refrigerate 30 minutes. Working with one
quarter of the dough at a time and keeping remainder refrigerated, roll heaping teaspoonful of dough into finger shape for
each cookie. Press almond firmly into 1 end for nail. Squeeze in centre to create knuckle shape. (Accompanying picture showed
long rolled shape with bulge at centre for knuckle; you puff it out rather than squeeze it in.) Using paring knife, make slashes
in several places to form knuckle.
Place on lightly greased baking sheets; bake in 325F (160C) oven for 20-25 minutes
or until pale golden. Let cool for 3 minutes. Lift up almond, squeeze red decorator gel onto nail bed and press almond back
in place, so gel oozes out from underneath. You can also make slashes in the finger and fill them with "blood." Remove from
baking sheets and let cool on racks. Repeat with remaining dough.
|
|
|
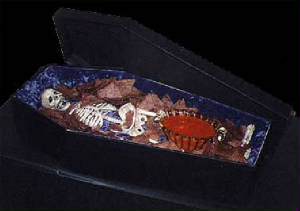
Decayed Corpse Chips With Entrail Salsa
blue corn tortilla chips
coffin
salsa
This isn't so much a recipe as it is a creative display.
Arrange the blue corn chips in a coffin in the shape of a long-dead corpse. The natural blue corn chips have almost a dusky
shade of brown in them that hints of decayed skin. Serve with a nice blood-red chunky salsa as accompanying entrails.
|
|
|
|
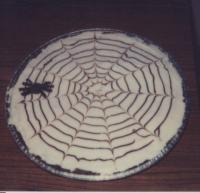
| 1 (21 1/2 |
ounce) package fudge brownie mix |
| 1/2 |
cup water |
| 1/2 |
cup oil |
| 1 |
egg |
| 1 (16 |
ounce) container vanilla frosting |
| 1 (4 1/4 |
ounce) package brown decorating icing |
| 1 |
large black gumdrop |
-
- Preheat oven to 350°F
Line a 12-inch round pizza pan with foil; grease foil.
Prepare brownie mix as directed on package, using the water, oil and egg; spread in foil-lined
pan.
Bake for 30 to 34 minutes; do not overbake; cool completely.
Frost brownie with vanilla frosting.
Make a spider web by piping the decorating icing in a spiral pattern, using the round tip; start
the spiral pattern at the outside and keep the lines about ¾ inch apart; using a toothpick or knife, draw lines outward through
frosting starting at center of brownie.
To make spider, cut gumdrop crosswise into thirds; place smaller rounded end on brownie, rounded
side up, to form body of spider; cut 4 thin strips from each remaining gumdrop slice to form legs; Place next to spider body.
|
|

|
|
| 3 |
tablespoons unsalted butter |
| 4 |
cups miniature marshmallows |
|
red food coloring, to taste |
|
yellow food coloring, to taste |
| 6 |
cups crispy rice cereal (rice krispies) |
| 4 |
ounces orange and black M&Ms plain chocolate candies (Halloween mix) |
| 4 |
ounces candy corn |
|
marshmallows (shaped like ghosts or pumpkins) or decorative candies, shaped like pumpkins,to decorate (optional) |
15 minutes 5 mins prep
- Melt the 3 tbsp butter in a large saucepan over low heat.
- While butter is melting, grease a 9x13-inch pan with softened butter or shortening.
- When butter is melted, add marshmallows and stir until they liquify; do not scorch.
- Add red and yellow food coloring to mixture until a nice orange color is achieved (about 2:1 yellow
to red).
- Remove mixture from heat and stir in rice krispies.
- Add M&Ms and candy corn, mixing them throughout.
- Spread mixture into the greased pan and press down lightly with a spatula to pack it.
- While it is still sticky, place ghost or pumpkin marshmallows, candy pumpkins, or even more candy
corn or M&M's on top to decorate as you desire.
- Allow mixture to set and harden slightly before cutting into squares and serving.
- Store unused treats in an airtight container.
|
|